
Welcome to my Blog. I'm trying a new format for my blog. Just click on the photo to see a larger photo and all the information regarding each post. Let me know what you think.
The Big Announcement!
Let me know what you think. Beginning this week...I'm starting my 12 weeks of Christmas!
Each Thursday I will post ideas to help you with your Christmas decorating, cards. and tags. Hopefully this will make your Christmas/Holiday season run smoothly, and take a little pressure off you during this hectic time of the year!
The first few weeks will we card ideas so you will have time to give my ideas a try to use this Christmas Season. Projects and tags will come later, unless I have a project that takes some time and I will post it in plenty of time for you to make it for Christmas. This information will be at the top of my blog for the next 12 weeks. Just scroll down to see the latest project, card or tag. I hope you will visit often.
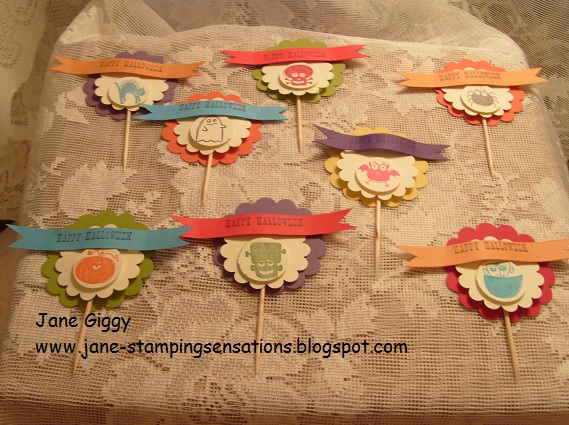
Today my post is Halloween cup cake picks.
 |
| All I need now is cupcakes |
 |
| Any color combinations looks festive! |

The back of the picks are blank...the toothpick is in between the 2 3/8" Circle and the 1 3/4" Circle
Products Used
Stamp Sets: Batty for You and All Holidays (retired)
Card Stock: Very Vanilla, Peach Parfait, Pear Pizzaz, So Saffron, Wisteria Wonder, Elegant Eggplant, Tempting Turquoise and Real Red.
Ink: Real Red, Tempting Turquoise, Pumpkin Pie, Pear Pizzaz, Garden Green, Basic Black, Marina Mist and Elegant Eggplant.
Adhesive: Stampin' Dimensionals
Non Stampin' Up: Wooden toothpicks, glue and glue gun.
To purchase any of the above products, go to my Stampin' Up! online store. http://janegiggy.stampinup.net
I used the 2/3/8" Scallop Circle, 1 3/4" Scallop Circle, and the 1" Circle punches. The banner came from the Petal Cone Die.I stamped all the images from the Batty for You set on Very Vanilla card stock in different colored ink. I punched out the image using the 1" Circle punch. This removed the phrase that is around the image. I stamped Happy Halloween on the banners and cut the end down using Paper Snips. Using a glue gun, I applied the glue all over one end of the toothpick and attached it to one of the 2 3/8" Scalloped Punches. Before the glue set, I layered the 1 3/4" Scallop Punch out over the top of the toothpick. Using Stampin' Dimensionals I placed the stamped image at the bottom of the 1 3/4: Scallop circle. To help the banner to bend, I ran the banner up and down vertically on the edge of the table, this gave the raised look in the middle of the banner. Using one Stampin' Dimensionals cut in half, I placed each half on either side of the stamped "Happy Halloween" on the back of the banner and placed it on the 2 3/8" Scallop Punch.
That's it! They are fun to make. I can just see little ones taking cupcakes to school for their Halloween party with all these little creatures on top.
Happy Stamping!
Jane


No comments:
Post a Comment