
I'm a little behind due to camera troubles. I finally gave in and bought a new camera and we are off and running now.
This post I will show week 10 and 11 in the 12 Weeks of Christmas.
My sister in law Phyllis Cooper brought me the cutest tea light. I wanted to make some and share with you.
Battery Operated Tea Lights

Aren't these tea light the cutest ever??
You will be able to make your own just in time for Christmas!
 |
You will need Real Red and Wild Wasabi card stock, 1/ 2" x 5 1/4" of Holly Berry designer series paper, Crop-a-dial, 1 3/4" Scallop Circle and Blossom Petals Builder punches, Multipurpose Liquid glue, glue and glue gun and silk flowers. This is the large leaf of the Blossom Petals Builder Punch |
 |
 |
  |
Punch 5 or six holes in the center of the 1 3/4" Scallop Circle card stock. I tried using a smaller punch but th1 3/4" Scallop Punch worked the best for me.


Using the Crop-a-dial, punch a larger hole in the center of the flowers so it will slip over the plastic flame from the candle. Put a small amount of Multipurpose Liquid Glue on the center of the Scallop Circle punch out. Slip the two layers of flowers over the flame, adding a small amount of glue on each layer.
That's it!

Here it is with the battery turned on. Wouldn't a grouping of these tea light be pretty on your Christmas table?
Coloring Stampin' Up! Silver Glitter Paper
Patty Bennett, a wonderful Stampin' Up! Demonstrator shared on her blog how to color our Silver Glimmer Paper all different colors.! If you follow my blog you know how much I love the Glimmer Paper. I will show you some projects I've made using the colored Glimmer paper at the end of this post.

Start out with a sheet of Sliver Glimmer Paper

There are different ways of coloring the Glimmer Paper
1. Use Stampin' Pad or Classic Stampin' Spots and a Sponge Dauber. This works well if you are going to color a small section of paper. Above, I used More Mustard ink. Just dab away and continue adding ink until the paper is completely colored like you want it.

2. Use Stampin' Up! Aqua Painters. Just add water a drop or two of reinker on a water proof plastic lid and paint the Glimmer Paper like you were painting any other project. This method works well if you are coloring a large sheet of Glimmer Paper
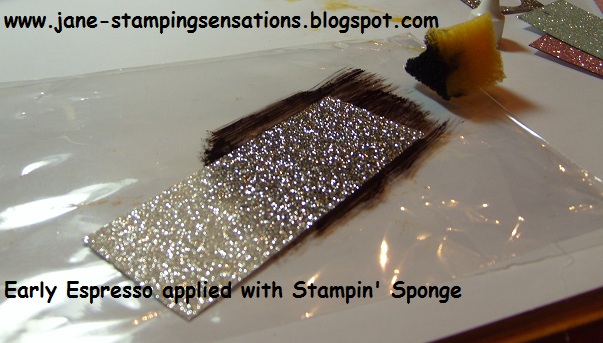
3. Use a Stampin' Sponge. Wear gloves when using this method.
I dipped my sponge in a small amount of re inker and wiped it across the Glimmer Paper. This works as well if coloring a large piece of Glimmer Paper.


Aren't these colors beautiful! What fun too!
Cards and other projects using the colored paper

Punches: Ornament and Lace Ribbon Border
Red & Sliver Glimmer Paper

Stocking Accents Die, Northern Frost Strip Die, Holly Berry designer series paper, Silver, Garden Green, More Mustard, Rich Razzleberry and Gold colored Glimmer Paper. Non-Stampin' Up! Bottle Cap, ornament hooks and Jewelry elastic.

Here is my little tree in my Stamping studio decorated with the above ornaments made out of Glimmer Paper.

Frosted ornament decorated with Red and Sliver Glimmer Paper punches from Itty Bitty Shapes Punch Pack and Mulitpurpose Liquid Glue. This makes a beautiful ornament and you will be able to use all the little scraps of Glimmer Paper so they won't go to waste.

Beautiful Card made with Red Glimmer Paper and colored Garden Green Glimmer Paper. Real Red and Whisper White card stock, Stampin' Dimensionals, 6 Basic Pearls colored with yellow Sharpie Marker.
Be sure to visit my online store for the Clearance Blitz of over 200 items up to 80% discount. Click here
Happy Stampin'
Jane
Be sure to visit my online store for the Clearance Blitz of over 200 items up to 80% discount. Click here
Happy Stampin'
Jane


Beautiful Creations, Jane!!! I don't know how you do it all! hugs, Laura H.
ReplyDeleteEach creation is better than the next. I love the tea lights, the poinsetta is spectacular and those ornaments are adorable. Thank you so much for sharing and instructions. Hugs and Merry Christmas Jamie Hintzen
ReplyDelete